Speeding up your Book Blog with a CDN
The problem with hosting is that often, your site is stuck in one place, and if that place is a long way away from your readers, all the code and the pictures and the writing that make up your book blog have to travel miles and miles, maybe even halfway across the globe, until they are seen on their screens. And sometimes that can take a long time.
Slow Speeds = Bored Users
The solution is something called a Content Distribution Network or CDN for short – and it’s technology that’s now used pretty much universally if you have a website that gets a lot of traffic from all across the globe. Basically, what happens is that a CDN creates a mirror image of everything on your sever – and reflects it around lots of different servers across the world. That means that all your images, html and css files and all the technical stuff is now not just in one location – it’s in three or four, or even more – so it’s much closer to your readers, which means that your page load time should decrease. Especially for us book bloggers, where we have lots of images of book covers populating our blogs, CDNs are great because they reduce A LOT.
All sounds peachy, right? But now you’re thinking – what about the cost? What about the technology? Won’t it be really complicated to do?
Actually, no. To all three of those questions. With two tools you can get a CDN for your book blog up and running in minutes, and your users will feel the benefit almost immediately. These two tools are W3 Total Cache for WordPress, which is a great cache for your blog anyway and the Amazon Web Services (AWS).
With Amazon Web Services, the great thing is you can have your CDN up and running for free. Yes, that’s right, for free – because AWS is offering a “Free Usage Tier” that allows you to use their resources for the first year without spending a penny. And even after that first year, prices aren’t sky-high: they’re really quite cheap – like 8p /12¢ per terabyte. And let’s be honest: that’s more than you’ll ever need. In any case, your first free year means that you can trial run it for a whole year and see if it’s worth it.
So to start with, what you’ll need to do is install the W3 Total Cache tool on your self-hosted WordPress site and create an AWS account with Amazon – it takes seconds. Once you’ve done that the fun begins.
Step 1: Once you’ve created an account with AWS, you’ll be given a public key and a secret key. Keep these safe – once you’ve closed the window on AWS, you’ll never be able to lookup them up again. So download them onto your computer or save them somewhere safe.
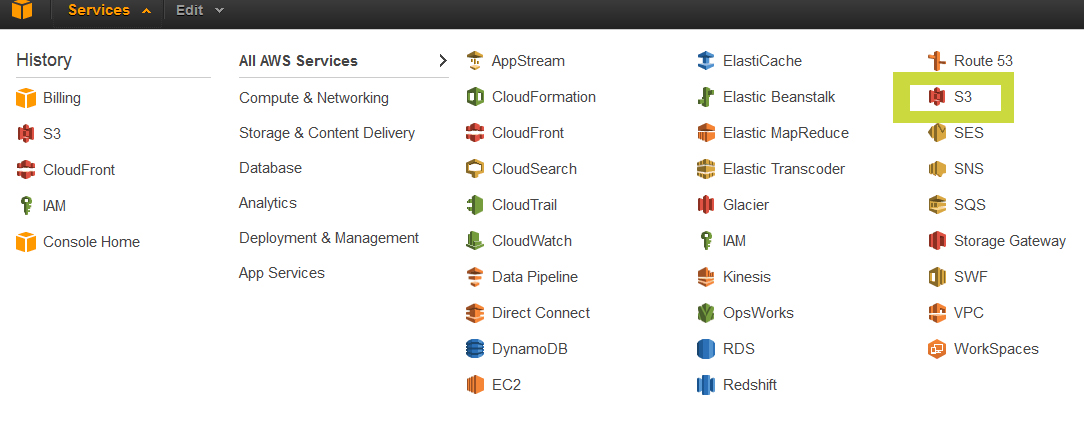
Step 2: On AWS, go to the “Services” menu and find the “S3” option. Click on “Create bucket”. Give your bucket a suitable name (eg. Your blog name) and choose a region you want it to be stored. This doesn’t really matter, but you might as well choose a country that is NOT where your current hosting is from. (Eg. If you’re host is American, use a European option etc). Then click create.
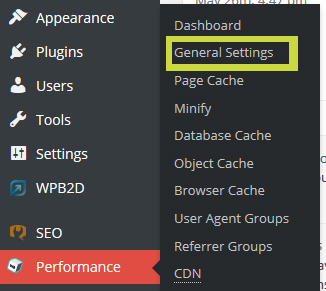 Step 3: Go to your WordPress Dashboard and click the “General Settings” tab under the “performance” menu (that’s the W3 Total Cache menu) and scroll down to the CDN box.
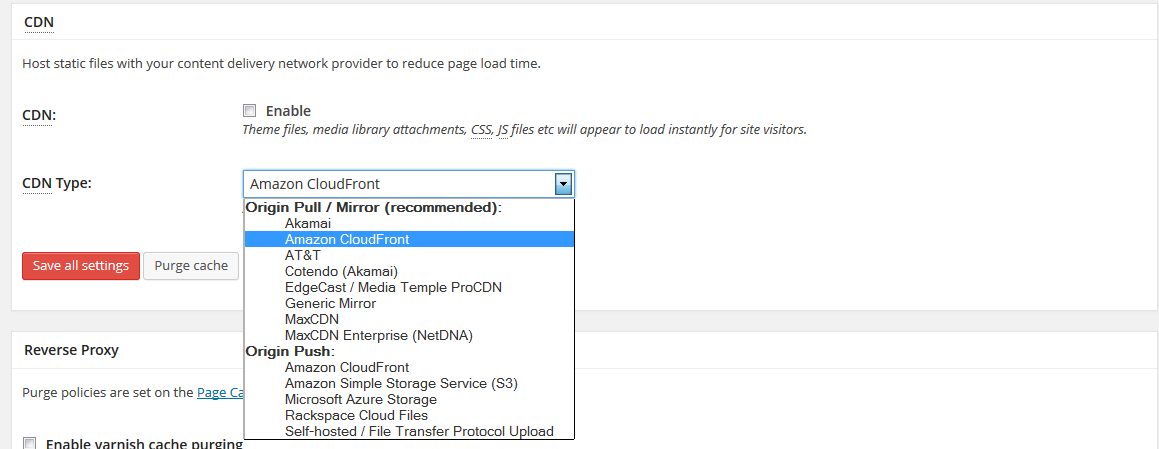
Step 4: Leave the “Enable CDN option untoggled for now – we’ll click that once everything else is done. Select “Amazon Cloudfront” from the drop down under the heading “Origin Pull/Mirror”. Save all settings.
Step 5: Back at the “Performance menu”, now select “CDN”. In the “General” box, adjust the settings to look like this:
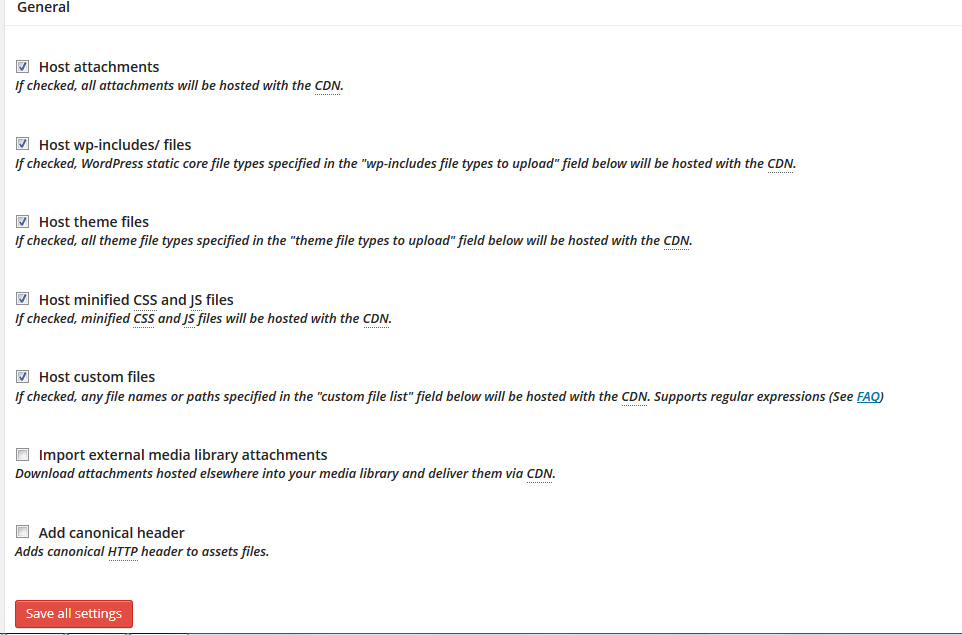
Only enable “Import external media library attachments” if you want to download ALL the images you ever embedded in your WordPress site from other websites – I don’t recommend it. Also a courtesy tip: never embed images from other sites; that’s called hotlinking and means that other websites’ bandwidth getsused up unnecessarily. Always upload images to your own sever; this gives you greater control, as well, in case third party sites delete them and you’re left with no images.)
Step 6: Scroll down to second ‘box’ with your CDN AWS settings. Use your public and secret keys from Amazon, which we got earlier, to fill in the first two boxes. Then click on “Create distribution”. Once this is done, you should have a string of letters in the “Replace site’s hostname with” field – this is the unique url where all your files will be mirrored. It’s not important.
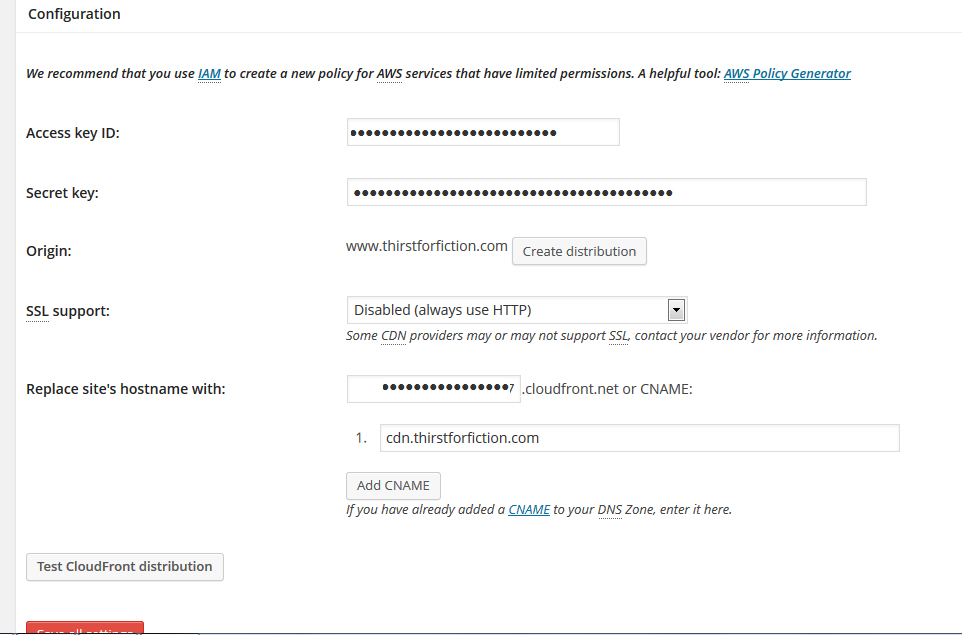
Step 7: Ignore the final “Add CNAME” field for now and click “Test distribution”. This could take a minute or so. If it returns a “Test Passed”, Click save all settings. Now return to the general settings and check the “enable CDN” we left unchecked in Step 4!
That’s it – you’re done! Easy, wasn’t it! There are a few optional extras now though, which include setting up a CNAME so that when someone goes to your site, it looks as if all your data is coming from your domain rather than something like “shsfjafjljljc.cloudront.net”
Optional Step 8: Go to your CPanel and click on “Simple DNS Zone Editor” underneath the “Domains” section.

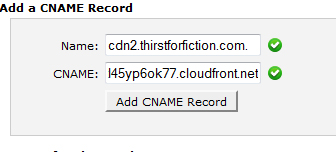 Optional Step 9: Ignore the first “Add an A Record” and go straight to “Add a CNAME record” option. For the name, you want to put in something like cdn.yourdomain.com – this is url that it will look like files wil be coming from. For the CNAME option, you need to get your Cloudfront distribution string – which we generated when we clicked “Create Distributon” in Step 6 and paste it in. Then add .coudfront.net onto the end so it looks something like this: d2ztl45yp6ok77.cloudfront.net. Once that’s done, click “add CNAME”.
Optional Step 10: return to WordPress and in the “CNAME” option on the CDN page we ignored in Step 7, paste the cdn.yourdomain.com that you put as the “Name” in Step, and save all settings. BE AWARE THAT SOMETIMES DNS PROPAGATION CAN TAKE A WHILE; IF YOU DO THIS STEP IMMEDIATELY AFTER STEP 9 YOU MIGHT FIND THAT YOUR BLOG WILL LOOK LIKE PLAIN TEXT WITH NO STYLING AND IMAGES. YOUR BEST BET IS TO LEAVE ABOUT 24 HOURS BETWEEN STEP 9 AND STEP 10.
And that’s it! You’re completely done! And doesn’t that little extra work pay off, so that instead of looking like your files are coming from some Cloudfront server, it looks like they’re coming from you!